
Neste post mostrarei como enviar objetos serializados para uma fila RabbitMQ através do Spring Boot.
O primeiro passo, deve ser a instalação do RabbitMQ. Recomendo a utilização do Docker.
Arquivo docker-compose.yml
| version: "3.7" | |
| services: | |
| rabbitmq3: | |
| image: rabbitmq:3-management | |
| environment: | |
| RABBITMQ_ERLANG_COOKIE: 'secret cookie here' | |
| ports: | |
| - 5672:5672 | |
| - 15672:15672 | |
| - 25672:25672 |
Executar o comando: docker-compose up para criação do container.
Segundo passo:
Na criação do projeto, devemos adicionar a dependência para conectar ao RabbitMQ.
| <dependency> | |
| <groupId>org.springframework.boot</groupId> | |
| <artifactId>spring-boot-starter-amqp</artifactId> | |
| </dependency> |
Em seguida, devemos adicionar os parâmetros para conexão ao RabbitMQ no arquivo application.properties
| spring.rabbitmq.host=localhost | |
| spring.rabbitmq.port=5672 | |
| spring.rabbitmq.username=guest | |
| spring.rabbitmq.password=guest | |
| queue.person.name=PersonQueue |
Terceiro passo:
Criar uma classe para configuração da fila.
| package com.matheuscarvalho.springbootrabbitmq.config; | |
| import org.springframework.amqp.core.Queue; | |
| import org.springframework.beans.factory.annotation.Value; | |
| import org.springframework.context.annotation.Bean; | |
| import org.springframework.context.annotation.Configuration; | |
| import lombok.AccessLevel; | |
| import lombok.experimental.FieldDefaults; | |
| @Configuration | |
| @FieldDefaults(level = AccessLevel.PRIVATE) | |
| public class RabbitMQSenderConfig { | |
| @Value("${queue.person.name}") | |
| String personQueue; | |
| @Bean | |
| public Queue queue() { | |
| return new Queue(this.personQueue, true); | |
| } | |
| } |
Através da propriedade personQueue temos acesso a fila configurada no application.properties.
No mesmo pacote devemos criar outra classe, para a configuração da serialização dos objetos no RabbitTemplate.
| package com.matheuscarvalho.springbootrabbitmq.config; | |
| import org.springframework.amqp.rabbit.connection.ConnectionFactory; | |
| import org.springframework.amqp.rabbit.core.RabbitTemplate; | |
| import org.springframework.amqp.support.converter.Jackson2JsonMessageConverter; | |
| import org.springframework.amqp.support.converter.MessageConverter; | |
| import org.springframework.context.annotation.Bean; | |
| import org.springframework.context.annotation.Configuration; | |
| @Configuration | |
| public class RabbitTemplateConfig { | |
| @Bean | |
| public Jackson2JsonMessageConverter producerJackson2MessageConverter() { | |
| return new Jackson2JsonMessageConverter(); | |
| } | |
| @Bean | |
| public RabbitTemplate rabbitTemplate(ConnectionFactory connectionFactory) { | |
| RabbitTemplate rabbitTemplate = new RabbitTemplate(connectionFactory); | |
| rabbitTemplate.setMessageConverter((MessageConverter) producerJackson2MessageConverter()); | |
| return rabbitTemplate; | |
| } | |
| } |
Quarto passo:
Criação das classes de envio e listener.
| package com.matheuscarvalho.springbootrabbitmq.queue; | |
| import org.springframework.amqp.core.Queue; | |
| import org.springframework.amqp.rabbit.core.RabbitTemplate; | |
| import org.springframework.beans.factory.annotation.Autowired; | |
| import org.springframework.stereotype.Component; | |
| import com.matheuscarvalho.springbootrabbitmq.model.Person; | |
| import lombok.AccessLevel; | |
| import lombok.experimental.FieldDefaults; | |
| @Component | |
| @FieldDefaults(level = AccessLevel.PRIVATE) | |
| public class PersonSender { | |
| @Autowired | |
| RabbitTemplate rabbitTemplate; | |
| @Autowired | |
| private Queue personQueue; | |
| public void send(Person person) { | |
| this.rabbitTemplate.convertAndSend(this.personQueue.getName(), person); | |
| } | |
| } |
| package com.matheuscarvalho.springbootrabbitmq.queue; | |
| import org.springframework.amqp.rabbit.annotation.RabbitListener; | |
| import org.springframework.messaging.handler.annotation.Payload; | |
| import org.springframework.stereotype.Component; | |
| import com.matheuscarvalho.springbootrabbitmq.model.Person; | |
| @Component | |
| public class PersonListener { | |
| @RabbitListener(queues = { "${queue.person.name}" }) | |
| public void receive(@Payload Person person) { | |
| System.out.println(person); | |
| } | |
| } |
A classe PersonListener deve escutar a fila e printar o payload no console.
Para finalizar, vamos expor um recurso POST para receber os dados e realizar o envio.
| package com.matheuscarvalho.springbootrabbitmq.controller; | |
| import org.springframework.beans.factory.annotation.Autowired; | |
| import org.springframework.web.bind.annotation.PostMapping; | |
| import org.springframework.web.bind.annotation.RequestBody; | |
| import org.springframework.web.bind.annotation.RequestMapping; | |
| import org.springframework.web.bind.annotation.RestController; | |
| import com.matheuscarvalho.springbootrabbitmq.model.Person; | |
| import com.matheuscarvalho.springbootrabbitmq.queue.PersonSender; | |
| import lombok.AccessLevel; | |
| import lombok.experimental.FieldDefaults; | |
| @RestController | |
| @RequestMapping({ "person" }) | |
| @FieldDefaults(level = AccessLevel.PRIVATE) | |
| public class PersonController { | |
| @Autowired | |
| PersonSender personSender; | |
| @PostMapping | |
| public void register(@RequestBody Person person) { | |
| this.personSender.send(person); | |
| } | |
| } |
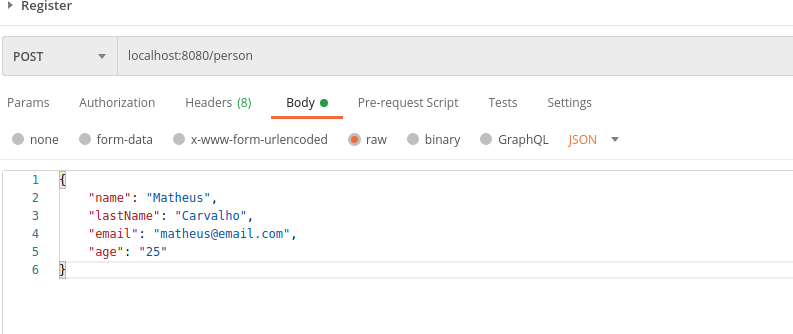
Imagens abaixo demonstrando input e output da aplicação.

Link do repositório: https://github.com/MatheusPCarvalho/springboot-rabbitmq-tutorial
Bons códigos! </>
